Manual Upgrade
It’s very important to keep Retraceur updated to its latest stable version. To be informed when a new version of Retraceur is available, you can alternatively subscribe to the software’s Bluesky feed or its GitHub Releases feed.
Step 1: Back up your database
Section titled “Step 1: Back up your database”It is extremely important to back up your database before beginning the upgrade. If, for some reason, you find it necessary to revert back to the ‘old’ version of Retraceur, you may have to restore your database from these backups. Once you’ve downloaded your .sql backup, open it into a text editor to check it actually includes all your db tables schema and data.
Step 2: Back up some of your Website important files
Section titled “Step 2: Back up some of your Website important files”Using a FTP software such as FileZilla, make sure to download the /wp-content directory as well as the wp-config.php & .htaccess files of your Website inside a specific folder of your local computer. Once you downloaded these files, open the folder within a text editor to check you can read the content of the wp-config.php file & browse into the /wp-content subdirectories.
Step 3: Deactivate ALL your Plugins and Blocks
Section titled “Step 3: Deactivate ALL your Plugins and Blocks”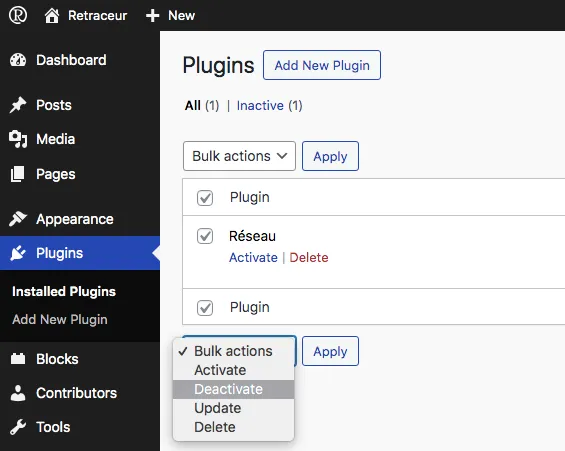 | 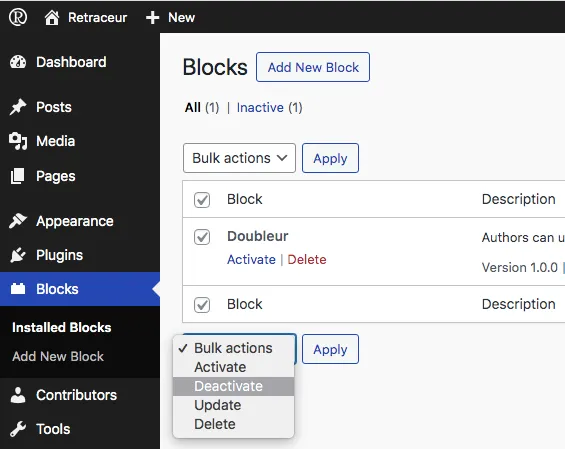 |
|---|
Go to the Plugins screen of your Retraceur Dashboard, select all your installed plugins and use the “Deactivate” bulk action to proceed as shown in the above screen capture. Do the same task from the Blocks Administration screen. It’s important to do so to prevent conflicts with potential plugins or blocks during the Retraceur upgrade process.
Step 4: Download and extract the Retraceur package
Section titled “Step 4: Download and extract the Retraceur package”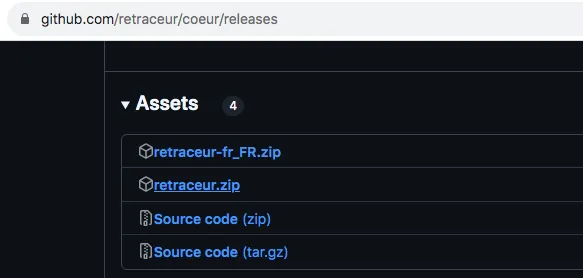
Go to the Retraceur’s Core latest release page on GitHub and from the Assets section, download the retraceur.zip archive and unzip it on your local computer. The Retraceur package will be extracted into a folder called retraceur.
Step 5: Delete the old Retraceur files of your Website
Section titled “Step 5: Delete the old Retraceur files of your Website”Delete all files but the /wp-content directory and the wp-config.php & .htaccess files. Once done, delete the /wp-content/themes/point directory which contains the default Retraceur theme that is bundled inside Retraceur.
Your Website files tree should look like:
- .htaccess
- wp-config.php
Directorywp-content/
- index.php
Directorylanguages/
Directoryplugins/
- …
Directorythemes/
- …
Directoryplugins/
- …
Directorythemes/
- …
Directoryuploads/
- …
Step 6: Upload the new files
Section titled “Step 6: Upload the new files”Using a FTP Software such as FileZilla, copy all files and folders except the /wp-content directory of the new Retraceur version you downloaded at Step 4 (from the extracted retraceur folder) to paste them at the root level of your Website files tree. Once done, copy the /wp-content/themes/point folder from the extracted new version package into the /wp-content/themes directory of your Website.
Your Website files tree should now look like:
- .htaccess
- index.php
- LICENSE.md
- README.md
- wp-activate.php
Directorywp-admin/
- about.php
- …
- …
- wp-config.php
Directorywp-content/
- index.php
Directorylanguages/
Directoryplugins/
- …
Directorythemes/
- …
- admin-fr_FR.mo
- admin-fr_FR.po
- continents-cities-fr_FR.mo
- continents-cities-fr_FR.po
- fr_FR-0cc31205f20441b3df1d1b46100f6b8d.json
- …
- fr_FR.mo
- fr_FR.po
Directoryplugins/
- …
Directorythemes/
Directorypoint/
- …
- wp-cron.php
Directorywp-includes/
- admin-bar.php
- …
- …
Step 7: Run the Retraceur upgrade script
Section titled “Step 7: Run the Retraceur upgrade script”Using a Web browser, go to your Retraceur Dashboard at the normal https://site.url/wp-admin location. Retraceur will check to see if a database upgrade is necessary, and if it is, it will give you a new link to follow.
This link will lead you to run the Retraceur upgrade script by accessing wp-admin/upgrade.php. Follow the instructions presented on your screen.
Step 8: Install updated Plugins, Blocks and Themes
Section titled “Step 8: Install updated Plugins, Blocks and Themes”Make sure to visit individual plugin, block and theme pages and look for the compatibility information with your new Retraceur version. Install new versions of your plugins, blocks and themes, if necessary.
Step 9: Reactivate Plugins & Blocks
Section titled “Step 9: Reactivate Plugins & Blocks”Go to the Plugins screen of your Retraceur Dashboard, activate each plugin, one at a time, and test that there are no problems before continuing. Once done do the same task for all your installed blocks from the Blocks Administration screen.
Nice job 💪.